CPA Goal
What Is CPA Goal?
CPA Goal is an automated bidding strategy that leverages machine learning to optimize your campaign performance. By analyzing real-time conversion data, the system dynamically adjusts CPC (Cost Per Click) bids and deprioritizes segments that underperform or exceed your target Cost Per Action (CPA).
While you still pay for clicks, the algorithm uses historical performance and live conversion data to predict the likelihood of each impression leading to a conversion. Based on these predictions, it sets the optimal bid:
- Higher Bids: Allocated to traffic with a high probability of converting at or below your target CPA.
- Lower Bids or Deprioritization: Applied to segments that fail to convert or consistently exceed your target cost.
The algorithm continuously tests live traffic, balancing cost and volume to stabilize your effective CPA around your specified goal. Over time, your campaign's average cost per conversion will converge toward your target, automating the manual process of bid tuning and maximizing spend efficiency on high-performing segments.
How It Works
CPA Goal optimizes bids in real time based on verified conversions delivered via postback (using the correct goal_id). The algorithm evaluates traffic at the segment level, defined as: source_id + GEO + SSP_id.
- High Performance: If a segment reliably delivers conversions within your Target CPA, bids are increased to capture more volume.
- Underperformance: If a segment is unlikely to convert or its eCPA exceeds your target, bids are lowered, and the segment receives less traffic.
- Non-Converting: Segments with no conversions are deprioritized.
- Retesting: Previously underperforming segments are occasionally retested using a portion of the Daily Test Budget.
Requirements
To ensure stable performance with CPA Goal, we recommend the following:
- Postback Integration: Must be correctly set up and validated.
- Conversion Volume: A minimum of 10 verified conversions per day is recommended for reliable optimization.
- Goal Selection: At least one Conversion Goal must be selected in the campaign settings.
NOTE
❗ CPA Goal requires consistent conversion data to optimize effectively. Without data, the algorithm cannot make informed bidding adjustments.
How to Set Up a CPA Goal Campaign
Step 1: Create a Conversion Goal for the Postback URL
- Log in to your MyBid advertiser account and navigate to the Goals tab.
- Click the + Create conversion goal button.
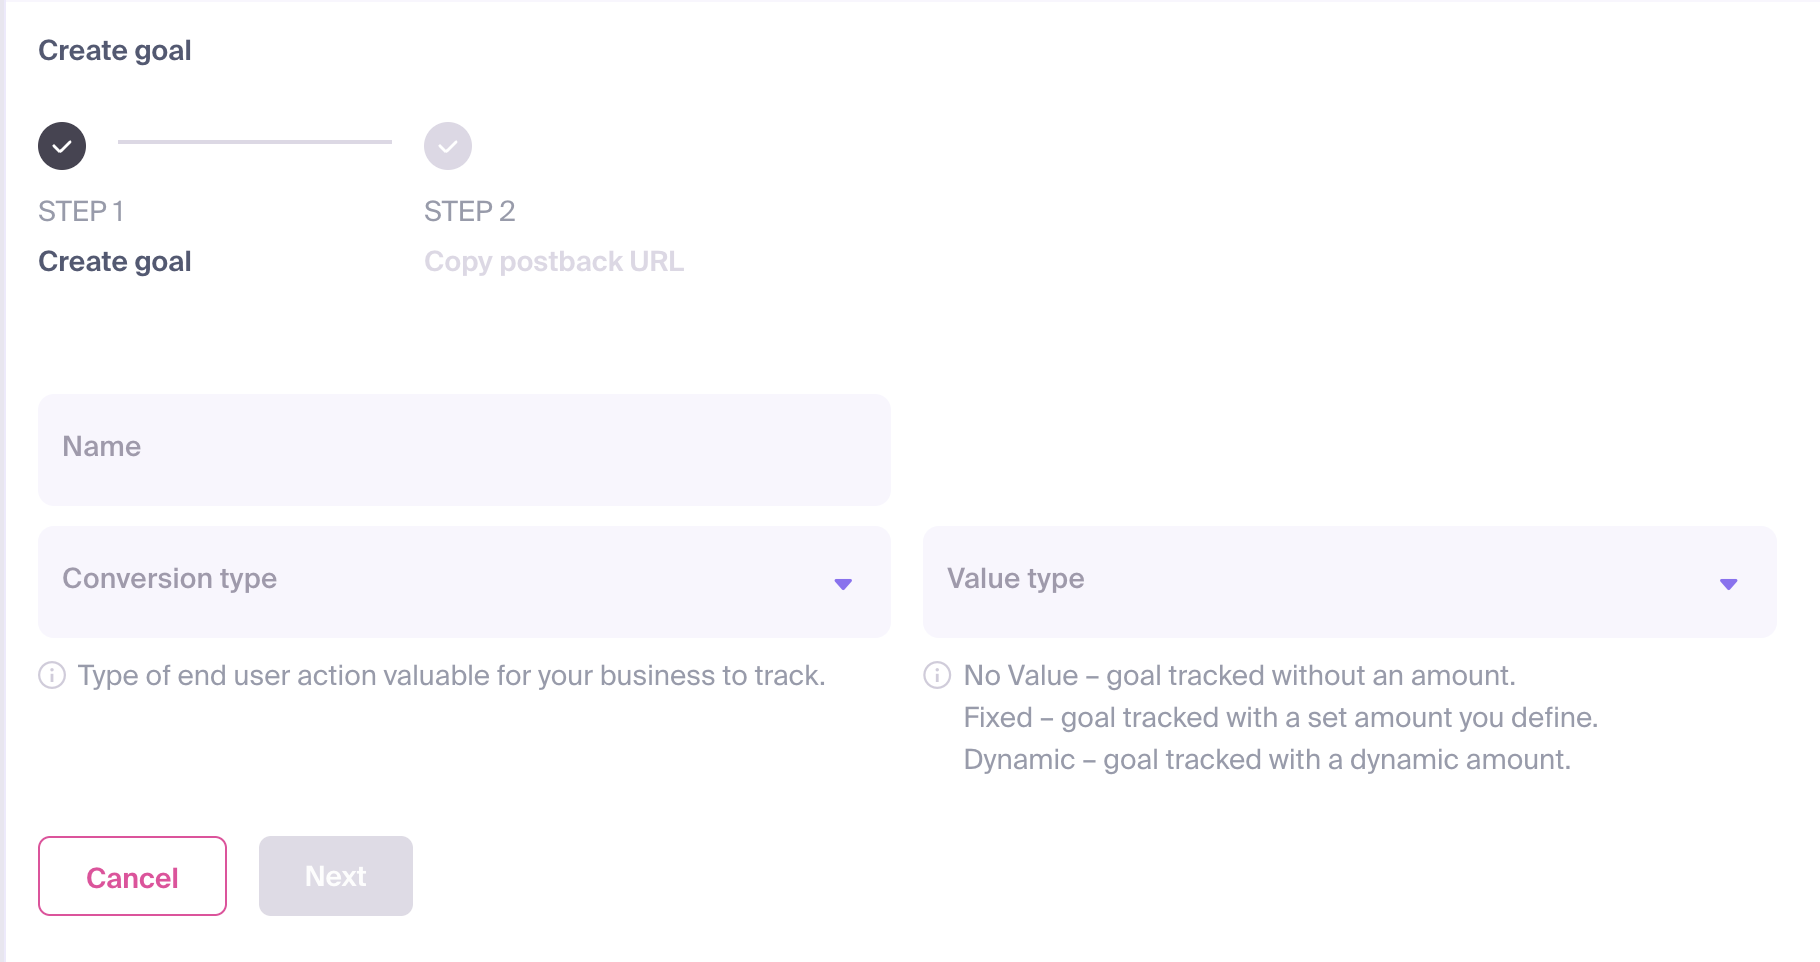
The configuration form will appear, requiring the following details:
- Name: Assign a clear and descriptive name that reflects the specific action (e.g., "Registration" or "Sale").
- Conversion Type: Select the category that best matches the user's action.
- Value Type: Define the payout for the conversion. This value is used to calculate your campaign's Revenue and ROI (Return on Investment). You can choose from:
- No Value: No specific monetary amount will be attributed to the conversion.
- Fixed: Assign a static amount for every conversion of this type.
- Dynamic: The conversion value will be passed dynamically through your postback URL.
Once configured, click Next.
A Postback URL will be generated. Note the
goal_idparameter in this URL.
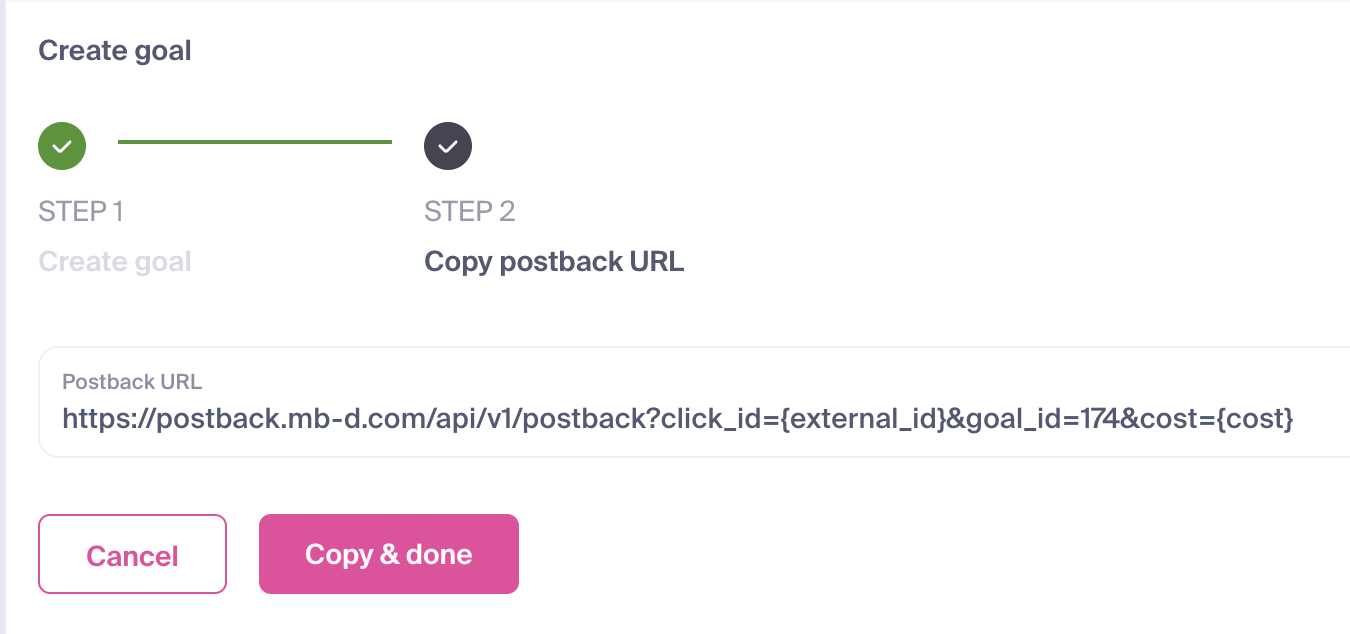
Click Copy & done to save your new goal and copy the postback URL for integration.
You are now ready to implement the postback in your tracking software or third-party platform.
IMPORTANT
Every Conversion Goal is assigned a unique goal_id. This ID is required to correctly associate user actions with the specific goal in your dashboard. Your postback URL should follow this structure:
https://postback.mb-d.com/api/v1/postback?click_id={external_id}&goal_id=186&cost={cost}Step 2: Configure the Campaign
- Create a new campaign.
- Under Pricing Model, select CPA Goal.
- Set your Target CPA:
- Recommended: Set this between 60–80% of your offer's actual payout.
- Example: If your offer pays $1.00, set the Target CPA to $0.60–$0.80.
- Select Conversion Goal(s):
- Choose the specific events the algorithm should optimize toward. Ensure your postback uses the correct
goal_idfor each event.
- Choose the specific events the algorithm should optimize toward. Ensure your postback uses the correct
- Set Budgets:
- Daily Budget: Your total maximum spend per day.
- Daily Test Budget: A portion of the Daily Budget used to explore and validate new traffic segments. As the algorithm identifies winning segments, the use of the test budget decreases automatically.
- Targeting:
- Recommended: Use only one GEO per campaign for the most accurate optimization results.
Key Rules & Logic
| Scenario | System Behavior |
|---|---|
| Segment eCPA ≤ Target CPA | Bids increase; spend is drawn from the Live Budget. |
| Segment eCPA > Target CPA or No Conversions | Bids decrease. |
| Continuous No Conversions | Segment is deprioritized. |
| New or Untested Segment | Tested using the Daily Test Budget. |
| Test Budget exhausted with no active segment | System waits until the next day to resume testing. |
| Conversion tracking failure | Zero conversions detected → All traffic is deprioritized. |
Best Practices
- Realistic Target CPA: Start with realistic goals. If volume is low, consider increasing your Target CPA rather than lowering it.
- One GEO Per Campaign: This ensures the optimization algorithm remains focused and efficient.
- Maintain Volume: Aim for at least 10 conversions per day to provide the algorithm with enough data for reliable optimization.
- Verify Postbacks: Always confirm your postback is firing correctly before launching.
- Leave Margin: Do not set your Target CPA to 100% of your payout.
- Initial Manual Test: Consider running a manual CPC test first to validate your creatives and offer before switching to the automated CPA Goal model.
Remember: CPA Goal is a conversion-driven automation tool. Its intelligence grows with the volume and accuracy of your conversion data. Set it up correctly, and the system will handle the rest.
NOTE
If you need assistance setting up your CPA Goal campaign, please reach out to us via live chat.